


Member Relationships
When creating groups, there are many situations where you want to keep two specific members in the same group, or conversely, keep them apart. The Member Relationships feature lets you define a relationship between two members (or, by combining multiple settings, among three or more) and use it as a condition for grouping.
Member Relationship Settings
Choose two members to define a relationship between, then set one of the following conditions.
Together (Keep together)
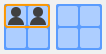
Apart (Keep apart)
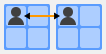
You can also set how strongly the condition should be enforced.
Must be (Required)
Should be (Preferred)
How to Set Up
Canvas View
- Select (Member Relationships) from the toolbar on the left side of the screen.
Start dragging from either one of the two members you want to define a relationship between.
As you drag, a line will extend from the selected member. Move it to the other member and drop it there. A relationship is created between the two, shown as a connecting line.
The icon displayed in the middle of the line represents the type of relationship between the two members.
Click or tap the icon from step 4 to change the relationship between the two members.
The type of icon and the line style represent the kind of relationship.
Together Apart Must be Should be Solid line Dashed line Clicking or tapping the line selects that relationship. The Property Panel opens in the lower right of the screen, where you can also change the relationship's settings.
- With a relationship selected, click or tap (Delete) to delete it.
Tabular View
To set up member relationships in table view, open the member table.
- You can check and edit relationship settings in the "Member Relationships" column.
- Click or tap the (Edit Member Relationships) for either of the two members you want to define a relationship between to open a dialog.
The dialog shows a list of the relationships defined between the selected member and other members.
- To add a new relationship, click or tap (Add Relationship). A new row will be added to the table.
- In the "Other members" column, choose the other member for the relationship, and in the "Relationships" column, choose the type of relationship.
Select OK to confirm your changes, or Cancel to revert to the state before the dialog was opened.
To delete a relationship, select Delete from the menu at the right end of each row.
The configured relationships are displayed in the member table.