


Attributes & Types
Attributes represent the characteristics or properties of members (e.g., gender, job role, or interests) and are used to balance the distribution when splitting into groups. The specific categories within an attribute (for example, "Men" and "Women" under a "Gender" attribute) are called "Types."
Examples of Attributes and Types
Attribute Examples Type Examples Gender Men, Women, ... Job Role Sales, Marketing, Tech, HR, ... Interests Entertainment, Food & Drink, Travel, Sports & Fitness, ... Skill Level Beginner, Intermediate, Advanced, ... Pet Preference Dog Person, Cat Person, ...
Attribute Settings
Name
Enter the name of the attribute. (e.g., Gender, Job Role, Proficiency, Interests, ...)
Type
Specify the specific categories included within the attribute. (e.g., Men/Women, Sales/Engineering, Beginner/Intermediate/Advanced, ...)
Placement Rule
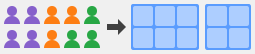
Determines how members are distributed into groups using attributes and types. You can choose from the following rules:
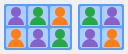
Distribute attributes evenly
Distribute members so that different types are mixed within each group as much as possible.
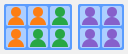
Group together by attributes
Group members so that the same types are clustered together within each group as much as possible.
Basic Attribute Operations
Canvas View
- To add a new attribute, click or tap (Add New Attribute) next to [Attributes] on the canvas control panel. A dialog will open to edit the attribute. Please refer to Attribute Editor Dialog for details on how to edit attributes.
- Created attributes will be displayed on the canvas control panel. Selecting an attribute will display its corresponding types and members on the screen.
- Click or tap (Edit Attribute) to reopen the dialog and reconfigure the attribute settings.
- Click or tap (Delete) to delete the attribute. This will also remove all attribute type values assigned to members.
- You can create multiple attributes. Click or tap (Add New Attribute) to open the attribute creation dialog again.
- You can assign a type value to members by dragging and dropping them into or out of the specific type areas.
Editing Types on the Canvas
Types can also be edited directly on the canvas.
- Select (Add Types) from the toolbar and click or tap anywhere on the canvas to create a new type.
- Switch the toolbar mode back to (Select) and select the created type to move, resize, or scale it.
- You can edit the name and color of the type from the context toolbar.
Tabular View
In Tabular View, all attribute operations are performed within the member table.
- To add a new attribute, click or tap (Add New Attribute) in the table header (header row). A dialog will open to edit the attribute. Please refer to Attribute Editor Dialog for details on how to edit attributes.
- Created attributes will appear as a single column in the member table.
- Each row in the table represents a member. You can edit which type each member belongs to directly from the cells.
- Click or tap (Edit Attribute) in the table header (header row) to reopen the dialog and reconfigure the attribute settings.
- To delete an attribute, click or tap (Delete) in the table header (header row).
- You can create multiple attributes. Click or tap (Add New Attribute) to open the attribute creation dialog again.
Attribute Editor Dialog
Used when creating a new attribute or editing an existing one. The Attribute Editor dialog allows you to manage attribute properties such as names, types, and placement rules.
- Edits the name of the attribute.
- Adds a new type to the attribute.
- Each row represents a single type. You can edit the type name and its display color.
- To delete a type, open the menu from the action button (vertical three-dot ellipsis) on the right edge of each row and select "Delete".
- Selects a placement rule. For a list of available options, please refer to the Attribute Settings description section.
- Distribute attributes evenly
- Group together by attributes
- Click "Create" (or "Save") to apply the new attribute settings, or "Cancel" to discard your changes.